| |
|
Before you buy
|
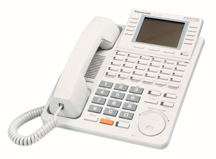 (1)
All of our Panasonic phone systems can be programmed
with a display phone, so you should order at least one. (1)
All of our Panasonic phone systems can be programmed
with a display phone, so you should order at least one.
(2)
If you want full system functions during a power
failure, you will need an external battery back-up system -- the same kind of
"UPS" (Un-interruptible Power Supply) that would
be used with a personal computer. Generally, the more you pay for the UPS,
the longer your system will work without normal power.
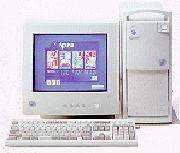 (3)
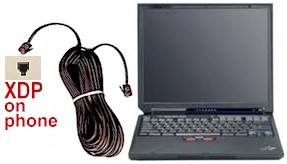
The digital control units can be programmed
with an IBM-compatible PC. You'll need our
ProCable or a serial cable and null-modem adapter from Radio Shack.
We recommend
Programmator software.
This software also allows you to
back-up your programming onto a floppy disk or hard drive, for restoration
after a chipset change or a disaster. (3)
The digital control units can be programmed
with an IBM-compatible PC. You'll need our
ProCable or a serial cable and null-modem adapter from Radio Shack.
We recommend
Programmator software.
This software also allows you to
back-up your programming onto a floppy disk or hard drive, for restoration
after a chipset change or a disaster.
The digital 816 and 1232 can be programmed
remotely via a modem. You can connect a standard modem to the serial port, or use
a special Panasonic modem in the 1232.
The analog 308, 616 and 624 can't be
programmed by PC, either locally or remotely. The digital 308 can be programmed by a PC,
but not remotely.
(4) The
traditional 4-conductor "quad" wire with green, red, black and yellow should
not be used in new phone installations. Use 4-pair (8 conductor) Category 3
or 5 wire.

Panasonic phones don't need four pairs, but
it's nice to have extra wire in the walls, and the cost of extra wire is
insignificant compared to the cost of opening up walls to add more wire
later.
The KX-T7130 and KX-T7135 phones requires three pairs of wire for
off-hook call announcing when connected to an analog or digital 1232 control unit. Other
current analog phones and control units use two pairs of wire. Digital phones can work on
one pair of wires, but need a second pair for the eXtra Device Port on the back of the
phone.
It's nice to have spare wire for
additional devices later on, or to compensate for wire damaged by plumbers or squirrels.
If you are running new wire, we recommend 4-, or 6-pair 24 gauge to each phone
location. Wire is cheap to buy. Installing more wire later on is not cheap, and can be
very messy. You can buy wire locally or
from us.
 If you need to install a phone in an adjacent
building, such as a garage, we recommend that you use cable designed for burial in the
ground. It's armored to protect it from sharp-toothed critters, and filled with
anti-moisture gel. If you need to install a phone in an adjacent
building, such as a garage, we recommend that you use cable designed for burial in the
ground. It's armored to protect it from sharp-toothed critters, and filled with
anti-moisture gel.
(5)
Analog phones CAN be used
with digital control units, but digital phones CAN'T be used with the
analog control units.
 We will give you one FREE JACK for each "system"
phone you order with a new phone system control unit. Let us know if you
want a wall jack, or either a surface-mount or flush-mount jack for a table
phone.
We will give you one FREE JACK for each "system"
phone you order with a new phone system control unit. Let us know if you
want a wall jack, or either a surface-mount or flush-mount jack for a table
phone.
(6)
In case of a power failure, you can
plug single-line phones into several jacks. The jack for the lowest intercom
number will work on your first line, the next jack on your second line, etc.
(The KX-TD308 provides power failure operation only at the first jack.) Panasonic control units have internal
batteries to maintain programming when power is off. the next jack on your second line, etc.
(The KX-TD308 provides power failure operation only at the first jack.) Panasonic control units have internal
batteries to maintain programming when power is off.
(7)
Any of the phones made for our
Panasonic phone systems, except the KX-T7880 and 7885 cordlesses, may be
used on a vertical or horizontal surface. The 7880 and 7885 can't be
wall-mounted.
|
| |
|
Wasting Time
 |
(1) Unnecessarily dialing 9
A surprisingly large number of people start their calls by picking up the handset and
dialing 9. And an even more surprisingly large number of people complain about having to
dial 9.WELL, FOLKS, YOU DON'T HAVE TO DIAL 9 (unless
you have "Centrex" service from your phone company, and if you do have it,
there's a good chance that you shouldn't have it.)
The best way to make a call with a Panasonic proprietary multi-line phone, is to simply
tap an unused "CO" line button, and immediately start dialing the number. You
don't even have to wait for dial tone. In a digital system, you can tap a button programmed
for one-touch automatic dialing, and it will choose a line, turn on the speaker and
microphone, and dial the call. In an analog system, you first tap a line button or
the SP-PHONE button, and then tap the programmed button.
The default programming in Panasonic systems is to connect you to the intercom when you
pick up the handset. This setup encourages you to dial with the speakerphone
instead of the handset -- a very sensible timesaver, since there is a good chance
that your call won't be answered or you'll be put on hold for a while before you get to
talk.
However, there are some people who insist on making calls the old-fashioned way, and
the thoughtful folks at Panasonic have provided a way for you to grab an outside line when
you pick-up the handset. The procedure is called Auto CO Hunting in
analog systems and Preferred Line Assignment - Outgoing in digital
systems. Look in the small manuals that are packed with each phone.
(2) Unnecessarily waiting for dial tone
Most people don't know it, but Panasonic systems have a really cool time-saving
feature: a buffer memory in the dialing circuit. If you've just made a
call, and want to call someone else, just tap the FLASH button, and immediately dial the
second number. The digits you dial will be absorbed into the buffer, while the system
waits until it hears dialtone from the phone company, and then it will spit out the digits
and your call will go through.
(3) Using the handset to shut off the speaker
This silly time-waster really drives me nuts, and I've slapped people's hands
when I've caught them doing this .
It's good to dial your calls hands-free, and then switch to a handset when a human
being finally picks up. But if you don't reach a person, or if you used the speakerphone
for the entire call, you can end the call by simply tapping the SP-PHONE button. Lots
of people, including my beloved wife, will quickly pick up the handset and immediately put
it down, to hang-up a handsfree call. This wastes time, causes unnecessary wear on the
phone, and really pisses me off!
If I see you doing it, I'll slap your hand, too. Don't do it! I'm serious. My
wife has a sore hand to prove it.
|
| |
|
|
| |
|
Most important Programming Steps

|
Panasonic phone systems have a huge number of programming
options, but you can literally take the control unit out of its shipping box, hang it on
the wall, plug it in, and start talking, with no programming at all. We
have listed the
digital system programming steps that are most important for most people.
NOTE: Many of the features have the same numbers in the analog KX-TA624
and KX-TA1232. Some
features discussed in the manuals are not available on older digital control units, but can be
added with an upgrade chipset available from AbleComm. Call 1
888 ABLE 999, toll-free.
 |
SUPER
IMPORTANT.
YOU GOTTA READ
THIS STUFF: |
| |
- "System
Programming" is normally done from the lowest-numbered
phone in the system, or another phone that has been designated
as a "manager's phone."
- To get
into system programming in a digital system or the KX-TA1232, press PROGRAM, *, #, 1234.
If your phone does not have a PROGRAM button, press the PAUSE
button.
- To get
into Station Programming (for one phone), press PROGRAM (or
PAUSE),
99
|
000 Date & Time
(Do this first.) |
600 eXtra Device Port
(DON'T set it up for jacks that have
multi-line analog phones, including Panasonic "system" cordless phones.) |
001 System Speed Dialing
(First make a list on paper.) |
601 Class of Service
(allows & denies privileges) |
| |
|
109 Expansion Unit Type
(Turn power off & on after change.) |
603/604 DIL 1:N (determines which lines ring where & when) |
| 406 Caller ID Assignment (CID won't work without this.) |
607/608 Door Intercom Ringing
(default is just one phone) |
505 Executive Busy Override
(allows barging-in on calls) |
128 (KX-TD308) or 133 (KX-TD816 and 1232) Caller ID jack (for standard phones & displays) |
The following features are useful, but may be less important. Items with asterisk* are important for Panasonic Voice Processing Systems.
002 Speed Dialing Names
(corresponds to numbers programmed in # 001) |
203 Intercept Time * (determines
how soon un-answered calls go to Voice Processor or ans. machine) |
| 003 Extension Number (changes
intercom numbers at jacks) |
407/408 DIL 1:1 ** (like
603/604, but just one jack per line) |
004 Extension Name
(allows
phones to display names on intercom calls) |
409/410 Intercept Extension * (sends
un-answered call to Voice Processor, ans. machine, person.) |
| 006 Manager Extension (allows
a second phone to program) |
009 Quick Dialing
(allows one tap of
touch-tone pad to make call. Requires #100 also) |
007 DSS/BLF
(allows use of DSS/BLF
display console) |
120 Programming Password (assigns
password needed to program) |
102 Voice Processor Port
*(Tells
the system which jack goes to Voice Processing System.
Original KX-TA624 only) |
124 Phantom Extension Number
(sets
up extension numbers for temporary shared use) |
| 110 Caller ID Code Set (used to
display name when phone company sends number only) |
125 Caller ID Area Code (ignores
local Area Code for call-back) |
| 111 Caller ID Name Set (works with
#110 in match-up table) |
126/127 Caller ID Modifications
(adds & deletes digits for call-back) |
117 Voice Processor Port
* (Digital systems &
KX-TA1232. Tells the system which jack(s) you're using for the Voice Processing System) |
130 or 131 Voice Processor Port
*(Tells
the system which jack goes to Voice Processing System.
KX-TA624-1 or later.) |
990 (Field 3)
Changes FLASH button
for use with Call Waiting |
417 CO Line Name Assignment
(allows
LCD to show words like "sales" or "emergency" or "children"
when call comes in.) |
** DIL 1:1 is used if you want all calls to be immediately answered by
the Voice Processing System, and will override DIL 1:N settings.
In
addition to system programming that can affect several phones or all phones, there are
programming steps and features that can make individual phones more useful. Here are some
of the best:
- Make sure your Auto Answer button is lit
up, so you can receive intercom announcements, and respond hands-free.
- Use the Call Forwarding (FWD) to send
un-answered calls to another phone or to voicemail
- Press BGM (or 1 on the touch-tone pad) for background
music, if your system is equipped.
- Use Absent Messages to show text messages
on other people's phones when you are away.
- Use System Call Waiting so your phone will ring even when you're on the phone. Press Intercom and
dial 7311 to set it up, or 7310 to cancel.
- Use Do Not Disturb (DND) when you don't want to receive calls. Press Intercom, press FWD/DND
and dial 1 to activate, or 0 to cancel.
- Press MESSAGE when you call a busy
intercom number. This will turn on the MESSAGE light
on the other phone, and the other person can tap that button to automatically call you
back.
- If you get a busy signal when you call an intercom number, you can
signal the other person by dialing 1 (if that phone is programmed for System Call Waiting
(above).
- Dial 330 to make an announcement
to all phones.
- If you want your phone to
automatically select an outside line when you pick
up the handset, press PROGRAM, dial 99, dial 12, press STORE, press PROGRAM.
|
More information is in the small Reference Guide packed
with each phone, and in the large User Manual. |
|
| |
|
|
| |
|
Programming Problems
 |
- If you're trying to program your phone system from a digital phone, and the display shows
"another use," it means that someone else is already
programming from a phone, or that a PC is connected for programming. Programming can only
be done from one phone at a time, or a PC, but not a phone and a PC simultaneously.
- The digital system installation manuals say that the maximum cable length
for connecting a printer to the control unit is 2m (6.5 feet). If you are connecting a PC
for programming or call detail recording, you should be able to go 50 feet or more.
- When using a KX-T7335 to program a KX-TA1232, the left and right arrow
keys on the template cover the Intercom and Message buttons and DO NOT
WORK as arrow keys during programming. In the front of the TA1232
Programming Guide (page 9) it mentions that the left and right arrow keys
should be the FWD/DND and CONF buttons. The 7335 does not have those
buttons pre-assigned, so in order to use the arrow keys
during programming, you have to set two of the CO buttons to FWD/DND and
CONF. For the left arrow, use Code 70 (CONF) and for the right arrow, use
Code 4 (FWD/DND). Ignore the left/right arrow keys on the template. Thanks
to Dick Snow for this valuable tip.
- We get calls from people who have trouble programming their phone system control units
("KSUs") and voice processing systems from a PC, but we've never found the
trouble to be caused by a bad Panasonic product, and it's almost never the fault of bad
software.
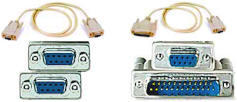 Many
people don't realize they need a null modem adapter
or AbleComm's special
ProCable for
programming a voice processor. You
need it (unless you want to make up your own null modem cable -- an activity best reserved
for extreme geeks and masochists). Many
people don't realize they need a null modem adapter
or AbleComm's special
ProCable for
programming a voice processor. You
need it (unless you want to make up your own null modem cable -- an activity best reserved
for extreme geeks and masochists).
Most trouble turns out to be a bad or weird cable, or a bad or weird null modem
adapter. Sometimes people will try two PCs, half a dozen cables and three or four null
modems -- things that they'll SWEAR are perfect, but just don't work
Some cables that work fine with laptops don't work with desktops, and vice-versa.
Some cables that work fine with Voice Processing Systems, don't work with phone
systems, but I've never seen the opposite problem.
I can tell you this much: AbleComm's special
ProCable
has never failed; and Radio Shack's own serial cable and their null
modem adapter will work most of the time.
You may have trouble if you use a 25-pin to 9-pin adapter, but a factory-made cable
with 9 pins on one end and 25 on the other should be OK. The KX-TD308 control unit
and the KX-TVS50 and 80 have
9-pin connectors.
|
| |
|
|
| |
|
Understanding ports and jacks
 |
The nomenclature for phones connected to the digital control units can be
confusing. You'll hear about jacks, stations, extensions and ports.
Sometimes they mean the same thing, and sometimes they don't. I'll try to clear it up. Click here for more help with telecom terminology.
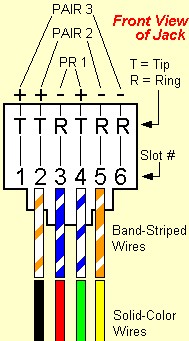 |
 The box or plate
on a wall where you plug-in your phone is a jack. The box or plate
on a wall where you plug-in your phone is a jack. A traditional
phone jack has four wires, arranged in two pairs.
In Panasonic systems, the green and red wires are considered to
be the voice (or analog) pair. The black and yellow wires are
considered to be the data (or digital) pair.
A jack with four wires can be thought of as one port...or two
ports.
|
|
| |
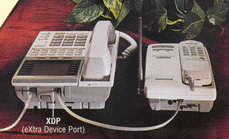 Panasonic's eXtra Device Port architecture allows the two pairs to be
separated, so you can operate a digital phone on the data pair (one port), and an ANALOG
SINGLE-LINE phone or device (such as a fax, pc modem, answerer or credit
card terminal) on the voice pair (another port). Panasonic's eXtra Device Port architecture allows the two pairs to be
separated, so you can operate a digital phone on the data pair (one port), and an ANALOG
SINGLE-LINE phone or device (such as a fax, pc modem, answerer or credit
card terminal) on the voice pair (another port). |
| |
|
| |
 The single-line device can be plugged into the XDP jack on the back of a phone, or
directly into any jack that has a working voice pair. It is not necessary to have a
digital phone in a jack, to use an analog phone or device. If you don't need an XDP in a
particular location, you can "send" that voice pair to another location, by
separating the voice and data pairs where they come out of the control unit, probably with
a punch-down block. The single-line device can be plugged into the XDP jack on the back of a phone, or
directly into any jack that has a working voice pair. It is not necessary to have a
digital phone in a jack, to use an analog phone or device. If you don't need an XDP in a
particular location, you can "send" that voice pair to another location, by
separating the voice and data pairs where they come out of the control unit, probably with
a punch-down block.
- A Panasonic ANALOG MULTI-LINE phone, such as the KX-T7030, requires all four wires when
used in either an analog or a digital system -- it uses more system resources than a
digital phone.
- You can't plug a multi-line phone into an XDP.
- Panasonic "system" cordless phones -- such as the KX-T7880, KX-T7885
and KX-TD7895 -- are considered to be analog phones, and require a
four-wire jack, with XDP disabled.
|
|
|
|
| |
|
Power & Protection
 |
-
 try to save a few bucks by skipping surge protection. Your
phone system can get fried by high voltage coming in from the power line or from a phone
line, or even from an outdoor phone jack, or wire connecting a phone or paging speaker in
another building. Surge protectors vary greatly. Don't think that a lump of plastic you
scooped up from a bin at the 99-cent store will do the job. You're investing a lot of
money in your phone system; and if it dies, the disruption will be annoying and expensive.
Your Panasonic warranty will not provide a free repair on fried equipment. Good power line
protectors cost $30 and up, and usually come with insurance to pay for any damage that
isn't protected against. We sell
power line protectors
and protectors for phone lines (up to 25 lines in one module). try to save a few bucks by skipping surge protection. Your
phone system can get fried by high voltage coming in from the power line or from a phone
line, or even from an outdoor phone jack, or wire connecting a phone or paging speaker in
another building. Surge protectors vary greatly. Don't think that a lump of plastic you
scooped up from a bin at the 99-cent store will do the job. You're investing a lot of
money in your phone system; and if it dies, the disruption will be annoying and expensive.
Your Panasonic warranty will not provide a free repair on fried equipment. Good power line
protectors cost $30 and up, and usually come with insurance to pay for any damage that
isn't protected against. We sell
power line protectors
and protectors for phone lines (up to 25 lines in one module).
-
 Panasonic makes
back-up power supplies to keep your system running during a black-out;
but they are designed to use automotive batteries or "gel cells," which can be a
PITA to install. We generally use computer-type UPSes (Un-interruptible Power Supplies)
which are easier to install, come in a wide range of sizes, and can provide power for both
a phone system and a voice processing system. We can help you figure out the proper model
to keep your system going for the desired length of time. NOTE: In a business, if you
don't have back-up power for your computers and lights, there's probably no point in
having back-up power for the phone system, because probably no one will stay in a dark
office to answer the phone. However, if you have a voicemail system that normally takes
messages when the office is closed, back-up power is important. Panasonic makes
back-up power supplies to keep your system running during a black-out;
but they are designed to use automotive batteries or "gel cells," which can be a
PITA to install. We generally use computer-type UPSes (Un-interruptible Power Supplies)
which are easier to install, come in a wide range of sizes, and can provide power for both
a phone system and a voice processing system. We can help you figure out the proper model
to keep your system going for the desired length of time. NOTE: In a business, if you
don't have back-up power for your computers and lights, there's probably no point in
having back-up power for the phone system, because probably no one will stay in a dark
office to answer the phone. However, if you have a voicemail system that normally takes
messages when the office is closed, back-up power is important.
During a power failure, with no back-up power supply, each Panasonic
control unit can allow one or more standard phones to operate, but with no intercom,
lights or system features. The KX-TD308 allows only one power failure phone, so put it in
the most important place, probably the master bedroom or kitchen in a residential
installation. An internal lithium battery will maintain your programming for several days.
|
| |
|
|
| |
|
Installer
Tips
 |
- If you have added an expansion module to a digital control unit
or the KX-TA1232, and it
does not work, check program #109 to make sure you have told your control unit which kind
of modules are in which positions on the front door, and TURN OFF and then TURN ON the control unit. The off/on
sequence is vital, and easy to miss. It's the last step printed in the manual for program
#109.
- If you are using a punch-down block, be aware of the sequence of the
wires that are attached to the 25-pair connectors in the KX-TD308 and
KX-TD1232 control units, and the KX-TD170 and KX-TD171 expansion
modules. Three pairs are assigned to each extension (or "station
port") and the sequence is {1} voice (analog) pair, {2} data
(digital) pair, {3} skip this pair. The sequence appears eight times in
each connector.
- If you remove the inner panel on a KX-TD816 to change a chip or add
Caller ID, be very careful putting it back on. There's a good chance that the little white
plastic connector for a back-up battery will not easily pop through the opening in the
panel. You might have to grip it with a long-nose pliers or guide it with a small
screwdriver. Be careful not to bend it so much away from the printed circuit board that it
comes off or breaks apart.
- Be careful installing the KX-TD193 Caller ID module. It's easy to
mis-align the pins, and a PITA to remove and re-install. Remember,
that in the KX-TD1232, a KX-TD193 in the lower position will work on the first four lines.
Also remember to order Caller ID from the phone company, and to use program #406 to make
Caller ID work on specific lines.
- While it is possible to change a chipset through the convenient little
door in the center of a KX-TD816 or KX-TD1232, it can be very difficult, and there's a
good chance that you will damage a pin on an expensive chip. It is actually faster to
unplug everything, put the control unit down flat, remove the main door and the inner
panel, and then replace the chips. Mark or tag the cords and cables that you unplug, so
they go back in the right places.
- If you want to use two KX-TD1232 units in tandem, make sure that they
have the same firmware ("chipset" version) and that one unit is designated as
the master, and one as the slave, using the small switch inside the central door. Turn the
two D1232s on at the same time, with the outside lines ("CO lines") disconnected
for a couple of minutes, and don't let anyone use a phone for a while. The initial
interconnecting period is important for "bonding," like a new baby and its
mother; and the procedure will work better if there is nothing else going on that can
affect either unit. NOTE: a "dash-two" can be a master for
a "dash-one" slave, but other combinations will not work.)
- Here are some valid numbers for Phantom Extensions: 100, 189,
190, 195, 200, 265-290. Other numbers may conflict with extension
numbers and features and will be a major PITA!
- Program 804 is called "External Pager BGM." It allows music being fed into the
system for music-on-hold and background music through the phones, to be also sent to a an external
public address system. The manuals should say "paging system," not
"pager."
- A 2-line cordless phone can work very
nicely in a Panasonic phone system. Connect each line to a different extension port from
the control unit.
- Unless you really want visitors at your front door
to be answered by a robot, make sure that any jack you're using for an answering machine
or voice mail, is programmed NOT to ring on calls from the door intercom.
- If you need LOUD volume coming out of a
Panasonic phone, you can easily connect a public address "horn" speaker. This
works well at pool cabanas and in factories. You can get one at Radio Shack for about
$40.You'll be surprised how far voices will carry with no additional amplification. The
normal microphone should work quite well, too. You can modify a Panasonic door intercom
speaker the same way, if you only need intercom capability. Modifications like this may
void your warranty -- BE CAREFUL!
- We've seen a couple of KX-TD816s lose the ability to ring
single-line phones. Somehow the power supply got damaged, perhaps by a
short-circuit, or maybe because too many old-fashioned "mechanical" phones were
connected. We've never seen the problem with any other control unit. Replacing the fuses
on the front panel won't help -- the unit will have to be repaired...so be careful.
- Instead of mounting your voice processing system
 next to the phone system control unit, mount it near one of your
computers, so it's easy to make programming changes. It won't take
up much space, and the wiring is very simple -- much simpler than
extending a serial cable 50 feet. next to the phone system control unit, mount it near one of your
computers, so it's easy to make programming changes. It won't take
up much space, and the wiring is very simple -- much simpler than
extending a serial cable 50 feet.
|
| |
|
|
| |
|
User
Tips
 |
- While it is possible to change the designated extension numbers
("intercom numbers") to give you a nice logical pattern (such as all phones on
the third floor begin with 3), it is a major PITA and probably not worth the
effort, unless you have a severe case of masochism.
- If you are on a call, and your phone doesn't ring or give you Caller
ID when another call comes it, you need to program "Internal Call
Waiting" for your phone. Press Intercom, then 7311 to activate.
- If you tap the HOLD button twice
in rapid succession (deliberately or by accident) you'll notice that the light
does a "double-wink." This means that the call is now on "exclusive
hold, and only the phone that put the call on hold, can take it off hold.
- Program #108 can be a terrific timesaver or a major PITA. It's used to establish "Automatic
Hold" for all the multi-line phones and DSS/BLF consoles in the system. It
saves time by automatically holding a caller on one line, when you want to use intercom or
another line, without having to use the Hold button. It's a PITA, because it will often
ACCIDENTALLY put lines on hold...even sending Music-On-Hold through the speaker on someone
else's desk (which might be fun).
- You can eliminate the alerting tone that people hear when you join a
conversation, by changing field # 13 in program 990 in the digital systems. This is good
for managers who have to monitor staff members who interact with the public, and for kids
who want to listen-in on parents' calls.
- The system can automatically correct the displayed time based on
information sent with Caller ID, once a day. Change field # 30, in program 990.
- If you want to transfer a call to a phone that is programmed to
forward the call outside, you need to do a "supervised" transfer. Press
Transfer, then dial the intercom number or press a pre-programmed button
for the person, and stay on the line until you hear ringing, then hang up.
Thanks to Panasonic TechWizard Frank for this tip.
|
| |
|
|
| |
|
Trouble
 |
- If one or two phones don't work, particularly in the lowest-numbered
jacks in each group of eight (but not the first eight in the D816), there is a very good
chance that the 25-pair Amphenol plug has come loose from the female connector in the
control unit, or in an expansion module.
- If you're trying to program your system from a digital phone, and the display shows
"another use," it means that someone else is already
programming from a phone, or that a PC is connected for programming. Programming can only
be done from one phone at a time, or a PC, but not a phone and a PC simultaneously.
- Panasonic phones systems are very robust. They are hard to
kill, but can be temporarily wounded. If your system crashes and you
can't bring it back to life by resetting, disconnect all the wires going to your phone
jacks. Then plug one in. If the phone works, keep re-connecting the others until you crash
again. Once you find the bad wire segment, disconnect it and inspect it. Chances are,
you'll find some damage to the wire, or maybe something soggy in the jack. If you have an
outdoor jack, check it first.
- If a phone is dead or intermittent, try it
in another jack that you know works OK, to see if the trouble is with the phone or the
jack. If you determine that the phone is faulty, swap its pluggable parts with another
phone to zero-in on the defect. Most-likely sources of trouble (starting with
most-likely): handset cord, handset, line cord, phone base, jack, wire between jack and
control unit, control unit.
- Things that people touch are more likely
to break than things that don't get touched. Wire outside a wall is more likely to have
problems than wire inside a wall. Phone equipment in an active office is more likely to
have trouble than phone equipment in a locked closet.
- If a phone has been unplugged and plugged back in and
doesn't work, make sure that both ends of the cord are snapped in
securely. On a digital phone, make sure its line cord is in the jack labeled "to
EMSS" or "to main unit."
- If a phone's speaker works, but the handset
doesn't, check to see if the headset/handset switch is set for a headset.
- If an analog phone is dead and you're sure it's plugged
into a live jack, check to see if the Program/Set switch is in the
Program position. If it is, move it to Set.
- If a phone has lights, but no sound, check
to see if one of the buttons is being kept pressed-down by the plastic overlay sheet,
particularly on first-generation phones like the KX-T61630 with12 auto-dial buttons. If a
button has slipped behind the plastic, wiggle it so it pops though the proper hole, and
you'll avoid a $75 service call. If it's an analog phone, a damaged cord or improper
(2-conductor) cord can give you lights but no dialtone.
|
| |
|
|
| |
|
Voice
Processor Tips
 |
(1) Try to structure your menu with relatively few choices at each
level (probably no more than 5). People often try
to remember each choice while waiting to see if a better choice is offered, and it's hard
to remember more than three. If you offer lots of choices, make one
choice to repeat the menu.
|
(2) Make sure you program some function for every possible keystroke on a
touchtone pad. If you are only offering three choices in a particular
menu, program the other buttons to send the caller to a receptionist or
someone else who can help, or make the extra buttons repeat the menu.
|
(3) Instead of mounting your voice processing system
next to the phone system control unit, mount it near one of your
computers, so it's easy to make programming changes. It won't take
up much space, and the wiring is very simple -- much simpler than
extending a serial cable 50 feet.
|
(4) You can program a touch-tone button to repeat the current menu. I like
to use the "7" button, which also includes "R," and
the menu can say "press R to Repeat this menu." If you need to
use 7/R for another function, try * for repeating.
|
(5) IMPORTANT NOTE: when
programming a Panasonic voice processing system to use with the KX-TA1232,
tell the voice processing system that you are using a KX-TD1232, not an
analog 1232!
|
(6) If you're having trouble getting your PC to communicate with a voice
processor, check the Flow Control setting in your communications parameters.
It should be "NONE" or "OFF."
|
(7) If you are programming with HyperTerminal, to save a setting and return to the previous screen,
use your
back-slash key (\).
|
(8) Tell your regular callers and your staff that they can save time while leaving messages,
by tapping two as soon as they get answered
by a voice mailbox. You can also make this timesaver part of your messages: "This is
Steve Blippo. In future calls you can skip this announcement by pressing two, and then
record your message immediately. Please wait for the beep, leave your name and number, and
I will call you back. Thanks."
|
(9) Instead of starting with a "custom
service" menu, record a brief "company greeting" message
(KX-TVS75, 100 or older 200) or replace system prompt #819 with a
brief announcement, such as "Thank you for calling Honest Charlie's
Used Cars." If there is an emergency or temporary change in your
company's schedule, you can call in from anywhere and change the
opening message to something like "Thank you for calling Honest
Charlie's Used Cars. Because of Hurricane Hilda, we will be closed until
Wednesday," but you won't have to re-record your big main menu.
|
(10) You can make a Panasonic Voice Processing System work like a simple
answering machine. In Custom Service #1, set the system so "no
DTMF input" sends callers to a specific mailbox. Record a brief
sound or a second of silence for Custom Service #1. A caller will hear
your "company greeting" or other initial announcement, and
will then go to Custom Service #1, and do nothing, and then reach the
assigned mailbox to leave a message.
|
(11) You can set up mailboxes that don't correspond to phones (for
outside salespeople, or club members, for example. Use numbers starting
with "2" and enable the eXtra Device Ports so the extension
numbers are valid. You will have trouble if you try to use a mailbox for
a non-existent phone beginning with "1."
|
(12) You can simplify the annoying pre-recorded "leave a
message" announcement in your mailbox:
- Call
into your mailbox (usually by dialing intercom 165)
- Press
4, and 4 again (for "Incomplete call handling")
By
default, three options are enabled:
option
#1: leave a message
options
#5: call the operator
option
#6: return to top menu
- Follow
the audible prompts to disable options 5 and 6.
- Thanks to Panasonic techwizard Rich for this
tip.
|
|
(13) If message-waiting lights don't work,
-
Make sure that the particular mailbox has the light enabled
(in the settings for that mailbox, accessed by phone.
Dial the extension number of the voice processor, then
press 6, then 2, then 1).
- Make sure that message notification is permitted, in
the authorization settings for that mailbox's Class of Service
(usually 1). With HyperTerminal, select Program, Class of
Service Setting, Authorization Setting.
- Make sure that "all calls transfer to mailbox" is
OFF (in the programming for that mailbox in the voice
processor, accessed by PC: Mailbox settings, #7).
- Make sure that the Call Hunting mode is NOT "AA"
or "VM." Phone system program #106, from display
phone (or PC software). "DIsable" is fine, unless you have a
reason to use another setting.
- Thanks to Panasonic techwizard Denton for this info.
|
|
(14) How to eliminate the annoying
"You have a call" announcement:
In HyperTerminal, press:
1 - Program
6 - Hardware settings
3 - PBX interface parameters
1 - dialing parameters
Change Extension Transfer Sequence to FXA
|
|
| (15) There are pre-recorded bits that produce "good
morning," "good afternoon," "good evening" and "welcome to the voice processing
system" messages that will be delivered before your first custom
menu. You can kill or modify these prompts if you want to, so callers
will hear your own message as soon as the system answers. See section
D6 in the appendix of the PDF manual, or section 6.1.4 in the HTML
manual. Make sure you have selected "User 1" not
"system" prompt in the custom service setting menu, and the
port service or trunk service menu, or your changes
will not take effect.
- Access the "Message
Manager's Main Command Menu": dial the intercom number for
the voice processor (usually 165 for the KX-TD816,
KX-TD1232 and KX-TA1232; 295 for the KX-TD308, and 107 for the
KX-TA624), then press #, 6, *, 998 (or 98 for the KX-TD308).
>> : This will not work if a PC is
still connected and in the programming mode.<<
-
Press [5] to
modify messages.
- Press [6] to modify the user prompts,
- Press [1] to change
user prompt 1.
-
Press [1] to change a specific prompt.
>>OR ON NEWER SYSTEMS,
press [1] if you want to re-record a prompt with your own voice, or
press [2] if you want to turn off a prompt. -
Enter the prompt
number you want to change.
Prompt 819 is "welcome to the
voice processing system." 248 is "good afternoon." 249 is
"good evening." 250 is "good morning." In some older systems (KX-TVS75, 100, 200), the
prompts are numbered 315 for morning, 317 for afternoon, 318 for
evening, and 316 for welcome.
-
Continue following
instructions. You can press 3 to turn off a prompt.
-
NOTE:
by eliminating the pre-recorded prompts, you will
cause a delay between the end of ringing and the first sound
that callers will hear. To minimize the delay, we recommend that
you replace prompt 819 with your own brief message ("Thank
you for calling Acme International") which will be be
played immediately before your main menu (usually "custom
1").
|
| (16) Normally all the ports in a voice
processor are available to handle calls to all of your phone
lines. If you want to separate the ports so you can use
different menus to serve multiple businesses, or a home plus a
business, you can use program #119 to put the ports into
different extension groups.
With the newest versions of the
voice processors, such as the TVS120, you can use "trunk service" to direct
incoming calls on specific lines to specific menus, without
changing the extension groups.
|
|
| (17) If you want calls going through
the voice processor to be forwarded to a phone outside, it's
best to have one of the following models: KX-TVS50-2, 80, 90, 110,
120, 200-2, 220, 300, 320. |
- Program a phone inside to use "Call Forwarding to Outside
Line" (in the large user manual).
- In the voice processor programming, change the Alternate
Extension Transfer Sequence. Press
1 for Program, then 6
for Hardware Settings, then 3
for PBX Interface Parameters, then 1
for Dialing Parameters, then select 5
for Alternate Extension Transfer Sequence, and make the change to
FWX.
- In the voice processor programming, enable Call FWD to CO
(Probably #15 in Class of Service)
The feature is not "officially supported" for the TVS75, 100 or
early 50 or 200, but it will usually work if you set the Alternate
Extension Transfer Sequence to FXWD, following the sequence above.
These models do not have a Class of Service setting for the
feature. |
| |
| |
|
 Michael's Manual