- This quick set-up guide
will help you get
your voice processor working in a typical environment, providing
both automated attendant and voicemail service, with a Panasonic phone
system that has either "DPITS" or "APITS" integration (KX-TD308,
KX-TD816, KX-TD1232, KX-TA624, KX-TA1232).
- The KX-TA1232 is more of a "dumbed-down" KX-TD1232 than a "grown-up"
KX-TA624, so it has more in common with the digital systems than with
the A624.
- This page does
not apply to older analog systems (KX-T30810, KX-T61610, KX-T123211D, or to the oldest
versions of the KX-TD816 and KX-TD1232 digital systems .
- Some of
your work will be done from a PC, and some will be done from a phone.
- The instructions on this
page are based on using terminal software, such as HyperTerminal which
comes with Windows, to access the DOS-like programming imbedded inside
the voice processors.
- Many of our
clients prefer to
use "VoiceMail Master" for Windows.
CLICK
for info, and a link to download a free demo.
- You can
modify the suggested settings to provide the best operation for your
particular needs.
- If you want your
high-tech voice processor to work like a dumb answering machine,
CLICK.
- Some material on
this page comes from Panasonic's "Quick Setup Guide."
- On this page, "Voice
Processing System," "Voice Processor," and "VPS" mean the same thing.
 IMPORTANT You will have to make a few
programming changes in your phone system so it will work
properly with the voice processor. Programming is usually done with a
display phone plugged into the
lowest-numbered phone jack (or from a PC with appropriate software if you
have a digital phone system). IMPORTANT You will have to make a few
programming changes in your phone system so it will work
properly with the voice processor. Programming is usually done with a
display phone plugged into the
lowest-numbered phone jack (or from a PC with appropriate software if you
have a digital phone system). |
|
|
 With DPITS With DPITS
(all
recent digital systems,
and KX-TA1232): |
-
If you are programming from a display
phone, use program #117 to specify which jack(s) you're using for the voice processor.
If you are unlikely to have more than two ports in the VPS, we
recommend jack 8 for the KX-TD308 and KX-TD816, and Jack 16 for the
KX-TD1232 and KX-TA1232. If you expect to have more than two ports,
start at a lower numbered jack. Remember that with a digital phone
system, one jack will support two VPS ports, so jacks 7 and 8 can
handle a four-port VPS.
- If you want phones to
ring before the voice processor answers,
use INTERCEPT ROUTING (programs #409
& 410) to send un-answered calls to the extension number that
corresponds to that jack, such as extension 108 for jack 8. Unless you
have a good reason not to, send all lines ("trunk groups") to
the same jack. You can enter "star" to program all lines the
same way, to save programming time. After you enter the extension,
number, the phone system will probably change it to
165
or
295, the artificial
extension number for the first port of the voice processor.
-
Use INTERCEPT TIME (program #203)
to select the number of rings before an un-answered call is sent to
the voice processor. The minimum setting for program #203 is three
rings, which will seem like four rings to the caller.
- If you want calls to be
answered immediately by the
voice processor, use DIL 1:1 (program #407 & 408). Direct
the lines to the extension number for the voice processor
(usually an artificial #165 in a KX-TD816 or D1232 system, or #295 in
a KX-TD308, regardless of the jack specified in #117).
|
|
|
|
 With APITS With APITS
(KX-TA624): |
| |
-
If you have the
ORIGINAL VERSION of the 624,
use program 102 to
specify the jacks used for the voice processor. We recommend jacks 7 and
8.
You will also have to use program 103 to establish DTMF
integration, or
upgrade
your 624 to a
later version.
-
If you have a
"DASH ONE" OR LATER
VERSION
of the 624,
use program 130 to
specify jacks 7 and
8, or program 131 for jacks 15 and 16. You must disable programs
100, 101, 102 and 103 if they were enabled.
-
If you want phones to
ring before the voice processor answers,
use programs 411, 412 and 413 to delay its
answering. You can select delays of 5, 10 or 15 seconds, an
inaccurate timing reference that represents one, two or three
rings. Make your changes for the jacks where the voice
processor is plugged in.
-
If you want calls to be answered
immediately by the voice processor,
use programs 408, 409, 410 to disable ringing for all phone jacks,
except the jacks where the voice processor is plugged in.
Thanks to PanaWizard Kirt for
his help on this section. |
|
|
|
| |

GREAT DEALS on slightly used
buttsets - vital telecom testers.
CLICK |
|
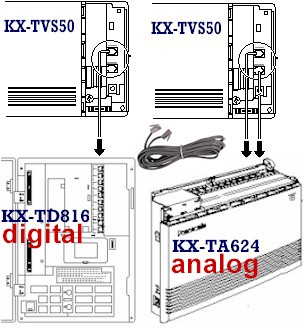 |
| With Panasonic KX-TD digital phone
systems, or the KX-TA1232, you use one phone cord for each two ports in the
voice processor. With other systems, you will need one cord
for each port. |
|
|
Before starting to
program the VPS, make sure it is connected to the phone
system. |
| |
- You can connect
the VPS to any jack in a digital phone system, EXCEPT the lowest
number jack.
- With recent
digital systems and the KX-TA1232, one jack in the
phone system and one phone cord will support two ports in the VPS
(connect it to Port 1).
- We recommend
Jack 8 for the KX-TD308 and KX-TD816, and Jack 16 for the
KX-TD1232 and KX-TA1232. If you are going to have more than two
ports in the voice processor, start with a lower numbered jack in
the phone system. Try to avoid connecting the VPS to expansion
modules, or to the second cabinet in a twin D1232 system.
- If you are
using the KX-TA624, we recommend using Jacks 7 AND 8. (connect
Jack 7 to Port 1 in the VPS and Jack 8 to Port 2).
|
|
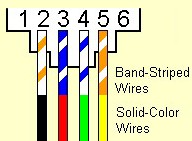
You need to use a four-wire (two-pair) cord, because the outer
pair of wires carries the vital data. |
 |
|
|
| |
 Instead of mounting your voice processor
next to the phone system control unit, you can mount it near one of your
computers, so it's easy to make programming changes. It won't take
up much space, and the wiring is very simple -- much simpler than
extending a serial cable 50 feet. Instead of mounting your voice processor
next to the phone system control unit, you can mount it near one of your
computers, so it's easy to make programming changes. It won't take
up much space, and the wiring is very simple -- much simpler than
extending a serial cable 50 feet. |
| |
|
| |
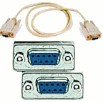 Connect your PC to
the VPS using the AbleComm ProCable, or a serial cable and null modem adapter from
RadioShack. Be sure to get a cable or adapter that has the right
connector for your voice processor. The ProCable-9 has two female
DB9 connectors -- perfect for the TVS50 and 80 and most PCs. Connect your PC to
the VPS using the AbleComm ProCable, or a serial cable and null modem adapter from
RadioShack. Be sure to get a cable or adapter that has the right
connector for your voice processor. The ProCable-9 has two female
DB9 connectors -- perfect for the TVS50 and 80 and most PCs. |
| |
|
| |
- Open HyperTerminal (from
Start, Programs, Accessories, Communications).
- Click on FILE, then NEW
CONNECTION. Assign a name, such as TVS50, and select an icon that you
like, and click on "OK."

- A "Connect to" window should open now
(shown above). In the
bottom section, select Connect Using COM 1 (or whatever port you are
using) and click on "OK."
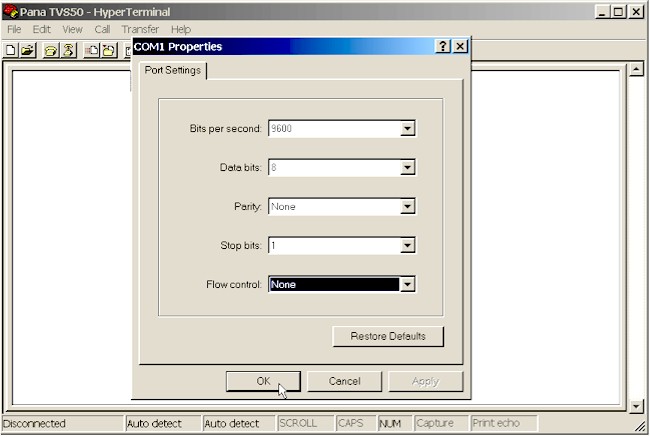
- A "Port Settings" window should open next
(shown below). Select
9600, 8, none, 1, none.
- CLICK on "OK."
NOTE: While
programming the voice processor, the PC screen display will often refer to
your "PBX." In this case, PBX means the control unit ("KSU") of your phone
system.
|
Plug in the voice processor, and turn it on if
there is a power switch. |
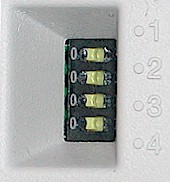 If your voice
processor has four tiny "DIP" switches, start the unit with the
switches in the following positions, to initialize the factory
settings: If your voice
processor has four tiny "DIP" switches, start the unit with the
switches in the following positions, to initialize the factory
settings:
| 1 |
right (1) |
| 2 |
left (0) |
| 3 |
right (1) |
| 4 |
left (0) |
During programming, you will be
instructed to move all the switches to left (0), so your settings can be saved. |
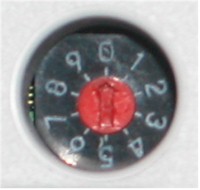 If your voice
processor has a small rotary switch, start the unit with the switch
pointed at 5, to initialize the factory settings. If your voice
processor has a small rotary switch, start the unit with the switch
pointed at 5, to initialize the factory settings.
During programming, you will be
instructed to move the switch to 0, so your settings can be saved. |
.
After turning the power on, the system starts up in the
following sequence:
1. The Power Indicator light goes on.
2. The Power Indicator light begins to flash.
3. “PORT TEST” is displayed on the screen.
4. “SYSTEM SETUP” is displayed.
Screen Output for phone
systems with DPITS: (may not be exactly as shown below)
Checking Flash Memory Cards.
Please wait...
PORT TEST ...
SYSTEM SETUP ...
1.. 2.. 3.. 4.. 5.. 6.. 7..
Active COs : 1 2
DPT Interface Connection is Established
** ON LINE MODE **
SET THE DIP SWITCH
(OR ROTARY SWITCH) OF THE
CABINET TO POSITION <0> OR ELSE ALL INSTALLER PROGRAMMING, USER
MESSAGES AND SETTINGS WILL BE LOST ON NEXT POWER UP!
This is your only warning. |
Screen Output for KX-TA624
phone system with APITS: (may not be exactly as shown below)
|
INITIALIZE COMPLETE ...
PORT TEST ...
SYSTEM SETUP ...
1.. 2.. 3..
4..
Active COs : 1 2
APT Interface
Connection is Established
** ON LINE MODE **
SET THE DIP SWITCH
(OR ROTARY SWITCH) OF THE CABINET
TO POSITION <0> OR ELSE ALL INSTALLER PROGRAMMING, USER MESSAGES AND
SETTINGS WILL BE LOST ON NEXT POWER UP!
This is your only warning. |
NOTE: The screen shows
"COs," which usually refers to lines from the phone company's
Central
Office. This is really STOOPID. It is really testing the ports in the VPS.
The display will alert you if
System Setup is not completed successfully.
Screen Output:
Active COs: 1 2
APT Interface Connection is not Established
** OFF LINE MODE ** |
The default
programming for the KX-TVS50 is for use with the KX-TA624 analog phone
system. If the TVS50 does not sense that is connected properly to a 624 you
will get the error message shown above.
- It is perfectly
OK to see this message if you are using a digital phone system, so just
press ENTER.
- If, however, you
are using a 624, it's time to check your connections and program # 102,
where you specify the jacks for the voice processor.
| IMPORTANT!
If you ever see a menu
like the one at the right,
select VT100. |
Please
Select Your Terminal Type.
1. ASCII TERMINAL
2. VT100
Please Enter the Number := |
|
When start-up is completed:
1. “**ON LINE MODE**” is displayed.
2. System prompt ">" is displayed on the screen.
Press ENTER.
You will then see the
System Administration Top Menu.
System Administration Top Menu
1.Program
2.System Reports
3.Utility Command
4.System Reset/Clear
5.Quick Setup
SELECT ITEM and PRESS Return-Key
PBX Type, VPS Port, Mailbox Extn., Time, Password |
Type [5] or cursor down to 5, and press ENTER
to begin the Quick Setup Sequence.
The screen will show:
Quick Setup Utility for connection to Panasonic
KX-T series telephone systems
This utility provides a quick way of programming the voice processor to operate in a standard automated attendant or
voice mail configuration when connected to a Panasonic KX-T series
telephone system. The system will prompt
you to enter, modify or confirm settings based upon which PBX type
you select.
By entering the appropriate information in the following screens,
the system sets PBX integration parameters, identifies the extension
numbers connected to it, creates default mailboxes, sets its ports
to handle callers with automated attendant or voice mail service,
sets system passwords and sets
the time and date. Finally, it confirms that you want to activate
the system based on the information you entered, modified or
confirmed.
To proceed, press Enter. To exit and cancel Quick Setup now, press
\. |
Press ENTER.
Screen Output:
Please select your PBX type.
1. KX-T308/KX-T616
2. KX-T1232
3. KX-T96
4. KX-T336
5. KX-TD816/KX-TD1232
6. KX-TD308
7. KX-TA series
0. OTHERS |
| If
your phone system is a KX-TA1232, and the voice processor "Quick Setup"
screen displayed on your PC does not include that model, select the
KX-TD816/KX-TD1232. DO NOT select "KX-T1232." |
Select your PBX type (control unit model #) by typing in
the digit preceding the model number on the PC screen, and press ENTER.
| |
| IMPORTANT TIP: you can
save a setting and move back to the previous menu by pressing the backslash
"\" |
| |
| |
You'll next see a mailbox editing screen. It may
automatically show some names if they had previously been programmed into
your phone system.
To add names, just type them in the "OWNER" column.
You can do lots of mailboxes now, or just enter one and come back later. To
move from one column or row to the next, press "enter." To
leave this screen, press "S" while your cursor is in the "MAKE" column.
|
Quick Setup - MailBox
Editing
Extension
and mailbox list Assigned 15 Vacant 15 Page 1/1
EXTN.
MBX OWNER MAKE (Make/Delete)
101 :
101 BUSH....... Make
102 :
102 GORE...... Make
103 :
103 ................ Make
104 :
104 ................ Make
105 :
105 ................ Make
106 :
106 ................ Make
108 :
108 ................ Make
109 :
109 ................ Make
110 :
110 ................ Make
111 :
111 ................ Make
112 :
112 ................ Make
113 :
113 ................ Make
114 :
114 ................ Make
115 :
115 ................ Make
116 :
116 ................ Make
P:
Previous menu, N: Next menu, S: Next Screen
|
You will next see the Port Service Setting screen. We
recommend that you leave it alone for now. You can change it later if you
want; but the default settings are fine for most situations.
|
Quick Setup - Port
Service Setting
All ports are currently
set up to handle callers with standard automated attendant
operation, day and night mode, using the Custom Service feature
(Custom 1). You can change the operation to standard voice mail
(Custom 2) or leave it as automated attendant. If necessary, Custom
1 and Custom 2 can be modified under the menu 'Program -> Service
Setting -> Custom Service'.
Day Mode Night Mode
PORT 1 Auto. Attend. Auto. Attend.
PORT 2 Auto. Attend. Auto. Attend.
A:Auto.
Attend., V:Voice Mail, S:Next Screen
Auto.
Attend.(using Custom 1),Voice Mail(using Custom 2) |
.
NOTE: The newest versions
of the voice processors have a "trunk service" feature that
allows you to direct incoming lines to specific custom service menus
(with "dash six" or later versions of digital control units, and "dash
three" or later of the KX-TA624). If you don't want different
menus for different lines, use "port service."
Program Menu
1.Mailbox Setting
2.Class of Service
3.Port/Trunk Service
4.Service Setting
5.System Parameter Setting
6.Hardware Settings
SELECT ITEM and PRESS Return-Key
Port Service, Trunk Service |
Program - Port/Trunk Service - Trunk Service Menu
1.Port Service
2.Trunk Service
Enter the Trunk Group Number( 1-48 ) = |
| |
| |
| BE
CAREFUL:
|
-
Where it says to enter a "Trunk Group Number," you enter a line
number (the first line in your system is line one, or "trunk one"), then
Day Mode.
-
This is really STOOOPID. A trunk group in
the voice processor is a group of one line; it's not really a
trunk or a group!
-
Also, a trunk group in the voice processor
has nothing to do with a trunk group in the phone system, (also known as "CO
Line Group," "Outside Line Group," "TRG," "TRK GRP," "lasagna" and
"Harvey.")
|
Program - Port/Trunk Service - Trunk Service - Day Mode Menu
Trunk Group Number [ 1 ]
Company Greeting No. (1-32,S:System,N:None) ------------ | None
Incoming Call Service ---------------------------------- | Custom
1
Incoming Call Service Prompt --------------------------- | User 1
Delayed Answer Time (0-60 s) --------------------------- | 0
Time Group No. (1-8) ----------------------------------- | 1 |
Then specify a company greeting if you want to use one (not
available on all systems), then assign a Custom Service number (keep
records on paper) then User 1 for Incoming Call Service Prompt, leave
Delayed Answer Time at zero, leave Time Group at 1.
Then repeat for night, lunch and break modes if you are going to
use them, and then do the other trunk groups, or ports.
|
The next screen is where you set an administrator's
password, to keep other people from messing up the system. You'll have to
enter it several times.
|
Quick Setup - Password
Setting
System
Administrator Password
( Maximum 8 characters )
NEW PASSWORD :=
|
The next screen is the last part of Quick Setup. It
saves your mailbox settings, and restarts the voice processor. Type "1" and
press ENTER.
|
Quick Setup - Setup
To set up
the mailbox and restart, select 'Yes'.
To cancel
and exit, select 'No'.
1.
Yes 2. No
|
The system will then restart and you will see:
PORT TEST ...
SYSTEM SETUP ...
1.. 2.. 3.. 4.. 5.. 6.. 7..
Active COs : 1 2
DPT (or APT) Interface Connection
is Established
** ON LINE MODE **
|
You will then reach the Top Menu.
Enter your password.
Type 1 and press ENTER to program.
Enter the Administrator Password :=
System Administration Top Menu
1. Program
2. System Reports
3. Utility Command
4. System Reset/Clear
5. Quick Setup (VT100 Mode Only)
Enter the Number := |
You will then see the Program Menu.
Type 4 and press ENTER to program your service settings.
Program Menu
1. Mailbox Setting
2. Class of Service
3. Port Service
4. Service Setting
5. System Parameter Setting
6. Hardware Settings
Enter the Number := |
Next comes the Service Setting Menu.
Type 2 and press ENTER.
Program - Service Setting Menu
1. Auto. Attn. Setting
2. Custom Service Settings
3. Caller ID Call Routing
Enter the Number := |
The next screen is where you start to program the
menus that callers will hear.
Type 1 and press ENTER.
|
Program - Service Setting
- Custom Service Settings
1. No
Description 6. No Description
2. No
Description 7. No Description
3. No
Description 8. No Description
4. No
Description 9. No Description
5. No
Description 10. No Description
Return : Check Next
Custom Service Menus
Enter the custom service
number :=
|
In the next screen, you will start working on the
first menu, called "Custom 1."
We recommend that you make the entries shown in blue in the screen shot
below, and keep the other settings for now.
In some cases, simply typing in an entry will move you along to the next
step.
In some cases, you will have the press ENTER after typing.
| |
| IMPORTANT TIP: you can
save a setting and move back to the previous menu by pressing the backslash
"\" |
| |
| |
|
Program - Service
Setting - Custom Service Setting - Custom 1 ( Not recorded )
1. Description [
]
:=
Main Menu
(or some other suitable
description)
2. Prompt Mode [
System ]
1:System
2:User1 3:User2 := 2
3. Menu Repeat
Cycle [ 3 ] ( 1 - 3 times ) :=
4. Call Transfer
Anytime [ Extn. ] ( Extn./Mbx/No ) :=
5. Wait for
Second Digit [ 1 ] ( 1 - 5 s ) :=
6. No DTMF Input
Operation [ c ] ( a - f )
a.Transfer to
Mailbox
b.Transfer to
Extension
c.Operator
d.Exit
e.Previous
Menu
f.Custom
Service
Select Operation
:= 1
-
This setting determines what
happens to callers who don't press any touch-tone buttons.
-
The default "c" will send the
caller to the lowest numbered phone.
-
You can change the setting if
you prefer another option.
|
You will then be able to start forming the actual menu,
by associating an action with a caller's key stroke on a touchtone phone.
It's a good idea to write out a script before you start programming the
buttons.
Any key stroke can send the caller to a person, or to
a group of people in a department, or to a mailbox, or to another menu, or
to the main menu, or can repeat the current menu, or allow the caller to
type in a few letters of a last name to reach someone, or do other things.
Create a “tree” diagram to design a route
leading callers to the desired person, department, mailbox, or next menu. This tree should include
all available caller options and cannot be deeper than eight layers. You
might want to discuss available
options with users before programming the system.
The top of the tree (at left below -- our tree fell down) should include what callers will hear
after a brief company greeting (in the TVS50, it may be a replacement for
the pre-recorded prompt # 819 -- more about it in the big yellow box below). Then create a branch for each option.
Fill in each box so
you can easily see what action corresponds to each keystroke, and make sure
that your spoken message corresponds to the programming.
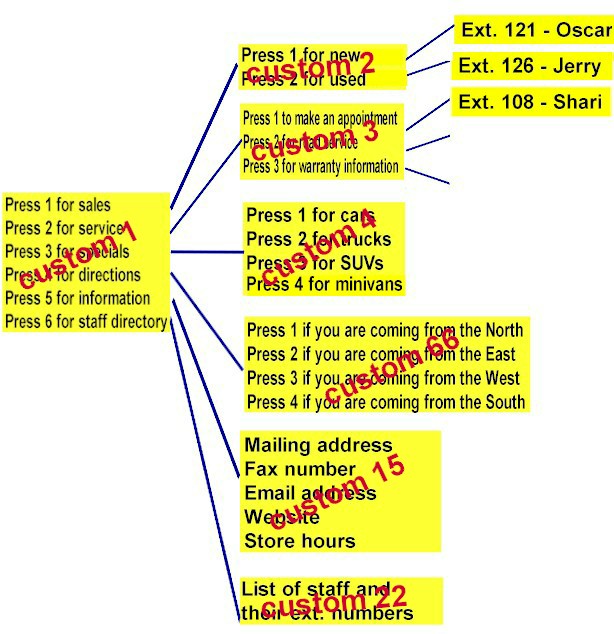
Remember that it is possible and often necessary to have
one custom service lead to another custom service. For example, if someone presses [1] for
sales, you might want another menu to say “for cars, press [1]; for
trucks, press [2].” This way callers are routed directly to the person best suited to
handle them.
The first menu (Custom 1) could be something like:
"If
you know the extension number of the person you are calling, you can dial it at any time.
For a staff directory, press one. To dial by name, press two. For sales,
press three. For customer service, press four. For travel directions, press
five. For our fax number, email address and website, press five. To repeat
this menu, press six. Thank you."
You will work your way through all the buttons on a
touchtone pad, starting with zero. We're showing just one here, but they all
look the same.
7. Keypad Assignment
Keypad 0 [ c ]
| |
|
| a.Transfer to Mailbox |
h.Call Transfer Service |
| b.Transfer to Extension |
i.Subscriber Service |
| c.Operator |
j.Department Dialing |
| d.Exit |
k.Dial by Name |
| e.Previous Menu |
l.Repeat Menu |
| f.Custom Service |
m.Main Menu |
| g.Voice Mail Service |
n.FAX Transfer |
Select Assignment := |
Once you have finished entering the settings for each digit in each menu, the menu
"messages" or "prompts"
should be recorded.
Menu messages tell the caller what options are available and
what keys correspond to those options, so the messages must match the
programming.
|
Unless you make changes, the first thing that callers
will hear will be "good morning" or "good afternoon" or "good evening" and
"welcome to the voice processing system." These prerecorded phrases are
called System Prompts.
You can eliminate or modify these prompts if you want to, so callers
will hear your own message as soon as the system answers. (See section
D6 in the appendix of the PDF manual, or section 6.1.4 in the HTML
manual.) Make sure you have selected "User 1" not
"system" prompt in the custom service setting menu, and the
port service or trunk service menu, or your changes
will not take effect.
- Access the "Message
Manager's Main Command Menu": dial the intercom number for
the voice processor (usually 165 for the KX-TD816,
KX-TD1232 and KX-TA1232; 295 for the KX-TD308, and 107 for the
KX-TA624), then press #, 6, *, 998 (or 98 for the KX-TD308).
>> : This will not work if a PC is
still connected and in the programming mode.<<
- Press [5] to
modify messages.
- Press [6] to modify the user prompts,
- Press [1] to change
user prompt 1.
-
Press [1] to change a specific prompt.
>>OR ON NEWER SYSTEMS,
press [1] if you want to re-record a prompt with your own voice, or
press [2] if you want to turn off a prompt. - Enter the prompt
number you want to change. Prompt 819 is "welcome to the
voice processing system." 248 is "good afternoon." 249 is
"good evening." 250 is "good morning."
In some older systems (KX-TVS75, 100, 200), the
prompts are numbered 315 for morning, 317 for afternoon, 318 for
evening, and 316 for welcome.
- Continue following
instructions. You can press 3 to turn off a prompt.
-
NOTE:
by eliminating the pre-recorded prompts, you will
cause a delay between the end of ringing and the first sound
that callers will hear. To minimize the delay, we recommend that
you replace prompt 819 with your own brief message ("Thank
you for calling Acme International") which will be be
played immediately before your main menu (usually "custom
1").
|
The next sequence shows you how to record the custom
service menus.
- Access the "Message
Manager's Main Command Menu": dial the intercom number for
the voice processor (usually 165 for the KX-TD816,
KX-TD1232 and KX-TA1232; 295 for the KX-TD308, and 107 for the KX-TA624), then
press #, 6, *, 998 (or 98 for the KX-TD308).
>>: This will not work if a PC is
still connected and in the programming mode.<<
- Press [5] to modify messages.
- Press [4] to change the custom service menu.
- You will hear: "Enter the Custom Service number [1] through [100]. To record the
Custom Service Exit prompt, press [0]."
- Press the button on your touchtone pad
corresponding to the custom service menu you want to record or change.
- Follow the instructions until all Custom Service prompts have been recorded, using the
tree that you created as a guide.
- After you have entered and recorded all menus, it is important to try the program yourself
to see that all functions perform properly. Dial into the system and try all the choices
to see if you are routed correctly. Verify that each menu choice works as it should.
People should learn
how to use the system, and should record their names and mailbox messages.
Click for our User Guides
|