- This
page is for use only with a Panasonic KX-TAW848 phone system.
- This
page provides information on preparing a phone system for a voice
processor equipped with two or four ports, using
"digital integration"
to communicate with the KX-TAW848. (If you want to have more than four
ports, you can use DTMF integration. See Page 130 in your Feature
Guide.)
- This
page was started before the KX-TAW848 was available, and may not be 100%
accurate. It gets revised as we learn more.
- You can
modify the suggested settings to provide the best operation for your
particular needs.
- On this page, "Voice Processing
System," "Voice Processor," and "VPS" mean the same thing.
|
|
|
|
 |
 |
You'll make the programming
changes from a PC with the "maintenance console" software
that was provided with your KX-TAW848.
|
| |
- The voice processor
connects to your KX-TAW848 through either hybrid
extension ports ("jacks") or proprietary extension
ports. Wiring diagram is
below. All ports used for a VPS must be in the same
circuit module ("card").
- Your VPS can receive
calls through either an artificial "floating
extension number" (such as 165) assigned to a voicemail
group, or through one of the voicemail group's
natural extension numbers (such as 104).
- When calls are directed
to a floating extension number, calls will hunt for an
available port, beginning with the lowest numbered
extension port assigned to the the voicemail group.
|
|
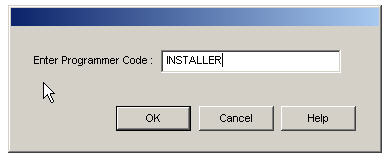 STEP
1: Open the Panasonic Software. STEP
1: Open the Panasonic Software.
Type in the Programmer Code, and click on OK.
The default code is INSTALLER
(all upper-case letters) |
|
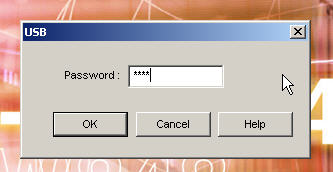
STEP 2: Connect to the KX-TAW848
Click on CONNECT at the
top-left of the screen, and then select your connection type
from the drop-down menu.
You'll have to use a password
for connecting to the VPS. Default is 1234. Type it in, and
click on OK. |
|
|
 STEP
3: Select the extension port settings screen STEP
3: Select the extension port settings screen
From the expandable menu at the left of
the screen,
click on Configuration, and then Extension Port
|
|
| STEP 4: Change the extension port settings

In the Connection column, find the
row opposite the port number for the jack where you are connecting
the first port of the voice processor. Click on INS, and change the
setting to OUS (out of service).
In the Extension Name column, type
"Voice Proc." in the box for the row you are working on.
In the Type column, click on the box
for the row you are working on. A drop-down menu will appear. Select
"VM (DPT)."
Click on "Apply" at the top of the
screen.
Click on OUS in the Connection
column, and change it to INS (in service).

At this point you'll probably see "No Connection" in the Telephone
Type column and "Fault" in the connection column. Don't worry; these
will change later when you do the "Quick Setup" in your voice
processor. The KX-TAW848 is very smart, and often knows what's going
on better than you do.
NOTE:
You can ignore the columns labeled "Location No." and "VM Unit No.",
and the one labeled "VM Port No." unless you are installing a 4-port
system. In that case, you will list VPS port 1 for one port in the
848, and VPS port 2 for the next port in the 848. Technically, VPS
port 2 in this situation actually refers to the second jack in the
VPS, which is used for the third and fourth ports.
Click on "OK." |
|
Step 6: Assign a Floating
Extension Number for your voice processor
|
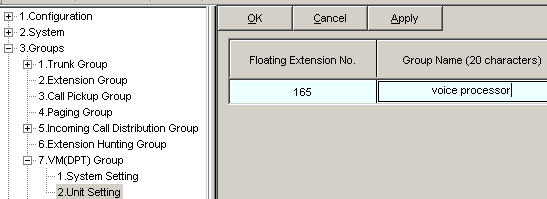 |
| From the expandable menu at
the left of the screen, click on Groups, then VM(DPT) Group,
then Unit Setting. On
the right side of the screen, type 165 under Floating
Extension Number and "voice processor" under Group Name.
Click on "Apply" and "OK". |
|
|
| STEP 7:
Assign a Floating Extension Number to handle your
incoming lines.
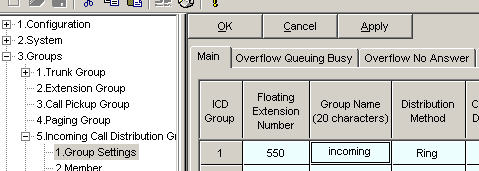 |
| From the expandable menu at the left
of the screen, click on Groups, then Incoming Call Distribution
Group, then Group Settings.
Select the "Main" tab, and type in a number, such as 550, for the
Floating Extension Number. Type in a Group Name, such as "incoming."
Click on "Apply" and "OK.". |
|
STEP 8: Put the ringing phones into a
group.
|
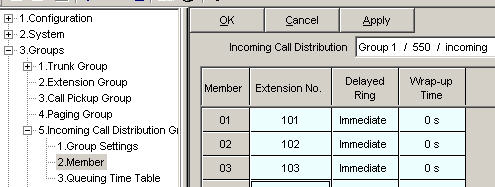 |
| |
| From the expandable menu at the left
of the screen, click on Groups, then Incoming Call Distribution
Group, then Member. Fill in the
Extension numbers of the phones you want to ring on all of your
phone lines.
Change the ringing from immediate to
delayed or disabled, using the pull-down menus that will appear in
each box under "Delayed Ring."
Click on "Apply" and "OK." |
|
| STEP 9: Set up the Overflow No Answer
Destination |
 |
| From the expandable menu at the left
of the screen, click on Groups, then Incoming Call Distribution
Group, then Group Settings. On
the right side of the screen, click on the "Overflow No Answer" tab.
Type in 165 as the destination in all
four columns.
Change the Overflow time to 20
seconds. (You can change it later if you want to.)
Click on "Apply" and "OK."
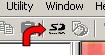 At
the top of the screen, click on the SD logo to save your changes
onto the SD memory card in the 848. At
the top of the screen, click on the SD logo to save your changes
onto the SD memory card in the 848. |
|
|
|
IMPORTANT:
After making the program changes in your
KX-TAW848, it's time to
program the VPS. Make sure it is
connected to your KX-TAW848. |
|
|
|
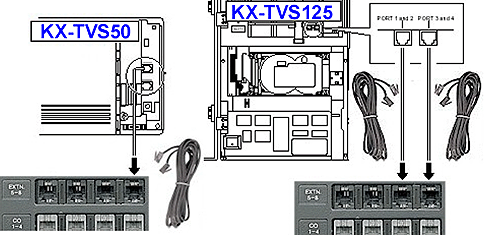 |
| The voice
processor connects to your KX-TAW848 through hybrid
extension ports (jacks) or proprietary extension
ports. These include ports in the 4-port hybrid module that
is pre-installed in the 848, as well as optional modules:
KX-TAW84870 (4 ports) or
KX-TAW84875 , (4 ports) or
KX-TAW84876 (8 ports). NOTE:
You can't use the KX-TAW84874 module for digital
integration, which provides more features and faster
operation than DTMF integration. |
|
| With the Panasonic
KX-TAW848 phone system, you use one phone cord for
each two ports in the voice processor. |
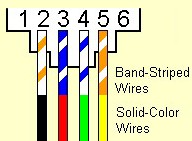
You
need to use a four-wire (two-pair) cord, because the outer
pair of wires carries the vital data.
|
|
- You can connect
the VPS to any extension jack EXCEPT the lowest-numbered jack.
- One jack
(port) in the KX-TAW848 and one phone cord will support two
ports in the VPS.
- We recommend the highest numbered jack
for a 2-port VPS, or the two highest numbered jacks for a 4-port
VPS.
- The KX-TAW848 can handle a
maximum of four voice processor ports, using digital
integration.
- If you want to
have more than four voice processor ports, you can use DTMF
integration.
See Page 130 in your KX-TAW848
Feature Guide. NOTE:
The KX-TVS204 4-port module used in current Panasonic voice
processors can NOT provide DTMF integration. You will have to
use KX-TVS102
2-port modules.
|
|
| |
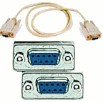 Connect
your PC to the VPS using the
AbleComm ProCable, or a serial cable and null modem adapter
from RadioShack. Be sure to get a cable or adapter that has the
right connector for your voice processor, which may be 9-pin or
25-pin. Connect
your PC to the VPS using the
AbleComm ProCable, or a serial cable and null modem adapter
from RadioShack. Be sure to get a cable or adapter that has the
right connector for your voice processor, which may be 9-pin or
25-pin.
>>You CAN'T
program your voice processor with a USB cable.<< |
 Instead
of mounting your voice processor next to the phone system control
unit, you can mount it near one of your computers, so it's easy to
make programming changes. It won't take up much space, and the
wiring is very simple -- much simpler than extending a serial cable
50 feet. Instead
of mounting your voice processor next to the phone system control
unit, you can mount it near one of your computers, so it's easy to
make programming changes. It won't take up much space, and the
wiring is very simple -- much simpler than extending a serial cable
50 feet.
For "long distance" programming, use the
AbleComm
ProConnector Kit. |
| |
|
.
You're
now ready to program your voice processor.
CLICK
|