Information below is based on Panasonic Document
KXTA6240002
Modified by AbleComm. We welcome your comments,
corrections and tips. Email
■ This procedure allows you to use
the KX-TVS50 voice processing system as a deluxe answering machine. You won't have
separate voice mail boxes for each person, but you can have
message-waiting lights on lots of phones (if your system version is a
"Dash-Three" or later).
■ You can have up to 20 phones in a
group, using one mailbox. When the mailbox has a new message, the
message-waiting lights will turn on at all phones in the group.
■ If you use this setup, you can NOT have a private mailbox for any of the
phones in the
group.

Part A:
Program your KX-TA624 from phone #101
-
In program 130 or
131, specify which jacks
(stupidly called "ports" on the phone display) in the 624 that the KX-TVS50
will be plugged into.
Program 130 lets you select jacks 7 and 8. Program 131 is for jacks 15 and 16.
Use the SELECT button to select the jack or jacks you want to use.
You can select just one jack, but you will lose half of the capability of the
TVS50 -- it will only be able to handle one call at a time. You must disable
programs 100, 101, 102 and 103 if they were enabled.
-
In program
963, select and
enable an unused jack in the 624. Here's how: press NEXT, enter a jack number
(with two digits), press SELECT to change disable to enable, then STORE.
-
In program
009,
rename the unused jack from step 2 as extension 100. Here's how: press NEXT,
enter the jack number
(with two digits),
change its extension number to 100, then STORE.
-
In programs
408, 409 and 410,
disable ringing to the jacks that were enabled in program 130 or 131.
To save time, you can enter * as a "wild card" to represent all lines, then #
plus the jack number, press SELECT to change enable to disable, then STORE.
-
Plug a single-line touch-tone phone into the jack chosen in step 2 above, and enable busy/ no answer forwarding to
the voicemail extension number that corresponds to the first jack selected in step 1 above (either 107 for jack 7,
or 115 for jack 15). Here's how: pick up the
handset, press 712 plus the extension number of the first voicemail port, and
press the # sign, hear a confirmation tone, then hang up.
 |
Part B:
Connect your KX-TVS50 to your KX-TA624 |
-
Connect ports 1 and 2 in the TVS50 to
the two jacks in the 624 that you selected in program 130 or 131, with 4-conductor
line cords.
-
Port 1 goes to the lower-numbered
jack.
-
You can use just one jack, but you will lose half
of the capability of the TVS50 -- it will only be able to handle
one call at a time. If someone is listening to voicemail, the
system will not be able to answer a call from the outside.
|
|
 Part
C: Part
C:
Program your KX-TVS50 with HyperTerminal
-
Connect your PC to the KX-TVS50 using the AbleComm ProCable, or a serial cable and null modem adapter from
RadioShack. Be sure to get a cable or adapter that has the right
connectors for your PC and voice processor. The ProCable-9 has two female
DB9 connectors -- perfect for the TVS50 and most PCs.
-
Open HyperTerminal in Windows (from
Start, Programs, Accessories, Communications). Some versions of Windows
don't install HyperTerminal automatically. If you don't have HyperTerminal, you
can install it from your Windows CD-ROM. You can also use other general-purpose
terminal programs, such as ProComm Plus.
-
If you are
using HyperTerminal, click on FILE, then NEW
CONNECTION. Assign a name, such as TVS50 or Wanda or Banana, and select an icon that you
like, and click on "OK."
-
A "Connect to" window should open now
(shown below). In the
bottom section, select Connect Using COM 1 (or whatever port you are
using) and click on "OK."

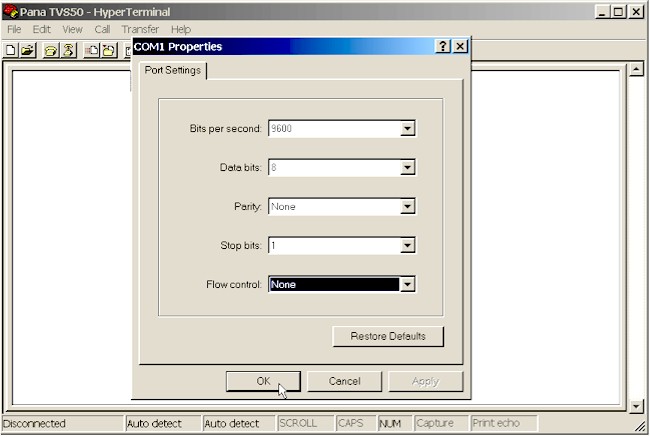
- A "Port Settings" window should open next
(shown below). Select
9600, 8, none, 1, none.
- CLICK on "OK."
-
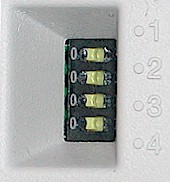 Set the
little
DIP switches in the TVS50 to right, left, right, left, and plug in
the power cord. Set the
little
DIP switches in the TVS50 to right, left, right, left, and plug in
the power cord.
-
The TVS50 should start up in the
following sequence:
1. The Power Indicator light goes on.
2. The Power Indicator light begins to flash.
3. “PORT TEST” is displayed on the PC screen.
4. “SYSTEM SETUP” is displayed on the PC screen.
-
When you are told to do so, move the switches
to left, left, left, left, and press ENTER.
-
Go to System Group
Assignment (Select Program, System Parameter
Settings, System Group Assignment).
-
Type “2," for Extension
Group, press ENTER.
-
Type "1," press ENTER.
-
When prompted, enter
100 for the group extension number, and give it a name. (You can name the group
"group" or "George" or "eggplant" or anything you want to name it). Press
ENTER.
-
Enter the extension numbers (intercom
numbers) of the
phones where you want to have a message waiting light working
(up to 20 phones). When you have finished, press
backslash (\) several times to return to the main menu ("System
Administration Top Menu").
-
Go to
Mailbox setup. (Select Program, Mailbox Setting)
-
Type "1," for enter/edit,
press ENTER.
-
When prompted for the
mailbox number, enter 100, and press ENTER.
-
Press 1 for Mailbox Settings,
then set the extension of owner to
be the same number of the group (100). Other settings: Name is irrelevant,
Class of Service is 1, Covering extension is none, Interview mailbox is
none, All calls transfer to mailbox in no.
-
You should
now have an extension group, a mailbox, and the extension of the owner for that
mailbox, all using number 100.
-
Go to Class of Service.
From main menu, select Program, then Class of Service.
-
When prompted to enter a
class of service, type “1” for class service number 1, press ENTER.
-
Set options 1-8 to maximum
settings or whatever is appropriate for you. (In option 7, "LIFO" stands
for "Last In, First Out," meaning you'll hear the newest message first.
You can probably figure out what "FIFO" means. "GIGO" means "Garbage In,
Garbage Out."
-
Continue to option
number 22. We recommend the following settings: 9-no, 10-no, 11-yes, 12-yes,
13-1, 14-user 1, 15-no, 16-yes, 17-30, 18-yes, 19-yes, 20-yes, 21-yes,
22-no.
|
NOTE: |
■ In
option 20, you will be presented with several options. Just keep
pressing ENTER to move along to number 21.
■ This is NOT the time to be
creative. Use our recommended settings until you are sure the basic
stuff is working, and then you can start experimenting. |
|